 You’ve decided to build a pond. Great ! Now…. Where to start?
Welcome to our ‘How to Build a Garden Pond’ guide.
We’ve been manufacturing and installing pond liners for over 50 years – so we’ve put together this handy pond design guide showing you how to build a garden pond; taking you from planning and installation through to the enjoyment of your beautiful new pond.
Things to think about before you start digging.
First of all – where should you position it? To get the most enjoyment from your pond, you might consider positioning it where you’ll have great views for most of the time. If you have room to place it where you can still see it from indoors – that’s just great! It’ll mean you can still enjoy your pond even if the weather isn’t good. In ideal conditions your pond needs around 5 to 6 hours of sunlight per day for the plants and water conditions to stay at their best. More than 6 hours per day may encourage excessive algae growth, resulting in green or murky water. Check which conditions are preferred by any plants you intend to add, as some may require specific conditions to thrive. If you intend to position your pond in a partially shaded area, bear in mind that falling leaves and other debris may increase pond maintenance time required. In addition, positioning close to trees may cause later issues with dropping sap or root growth and movement. It’s also worth checking that you won’t be digging through buried wires or cables.
Plan Your Stock.
Work out how many inches of fish you can comfortably accommodate in the size of pond you’ve chosen. Overloading your pond with stock will lead to poor water conditions if not properly cared for and will affect your fish and plant health and growth rate.
We have a guide for calculating approximate volume in litres although this can only be applied for box shaped ponds.
Multiply Max. Length x Max. Width x Depth x 1000
Example: A pond 4.0m long x 5.0m wide with a depth of around 1.0m would hold approximately 20,000 litres of water.
Waterfall or No?
Be sure to allow room for a waterfall if you want one. Knowing where you want it in advance will save a lot of time later as you can pre-position the soil you need to build it up as you dig it out from your pond.
For more complex shapes and sloping sides we would recommend that you meter the water into the pond when filling to have an accurate volume measurement.
What Type of Pond Do I Want?
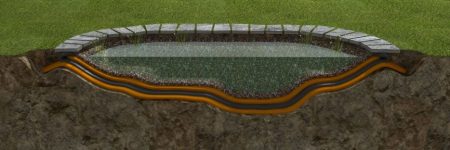
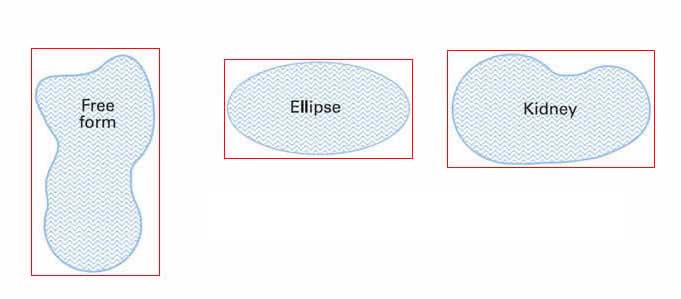
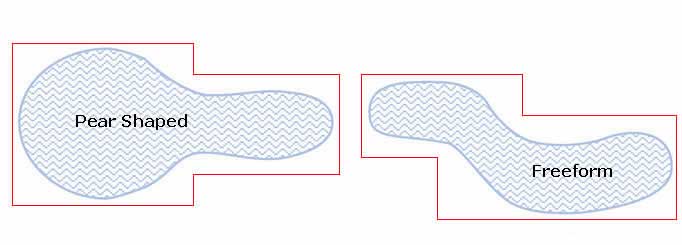
Informal Ponds are very natural looking and can take any shape you choose. They tend to have gently varying depths and sloping sides. Flat sheet liners are ideal for these type of ponds as the flexibility of the sheet allows it to conform to variations in the excavation when the pond is filled. Try to avoid tight curves or shapes that are too intricate as this may affect water circulation around the pond.
Larger Ponds with liner requirements in excess of 200m² that are complex in design may benefit from our staggered panels; simply Contact Us with a dimensioned sketch or drawing and we’ll be pleased to provide pricing for a custom made staggered panel to perfectly suit your requirement.
Ok… Let’s dig!
When you’re ready to start, the first thing you need is to plan the shape of your pond.
-
Mark out the shape of your pond using a length of rope or hosepipe. Inspect your shape from different angles to be sure you are happy with it.
-
When you are satisfied with the shape, mark it out by pouring sand around the perimeter and then remove the rope / hosepipe.
-
Start digging out the pond crater from just inside the sand mark, keeping all sides of the pond sloped at around 20 degrees to avoid soil collapsing into the hole.
-
If required, dig a series of steps descending to the bottom of the pond.
-
Outside the sand line, remove a strip of turf approx. 450mm wide and approximately 50mm deep all the way around for the liner overlap.
-
Using a spirit level placed on a flat plank, check that the edges of the pond are level all the way around. Use the spoil from your excavation to build up any low areas.
-
Check that any underwater steps are also level, as any irregularities will be apparent when the water is added.
-
Remove any protruding stones or other debris that could damage the liner.
-
Compact the sides of the pond so that it doesn’t collapse later on.
-
You’re now ready to line your pond !
So how do I calculate the size of the flat sheet liner I need?
Measure your excavation: taking measurements at maximum length, maximum width and maximum depth. Now calculate your liner size as follows:
Flat Sheet Liner Length = Pond Length + 2 x Pond Depth + 0.6m (2ft)
Flat Sheet Liner Width = Pond Width + 2 x Pond Depth + 0.6m (2ft)
The additional 0.6m (2ft) is to allow for anchoring the liner around the periphery (up to 0.3m (1ft) on each side) either below stones, railway sleepers or anchored into the ground in an anchor trench or beneath the turf.
Example calculation for a pond 20ft (6.09m) long x 12ft (3.66m) wide x 3ft (0.91m) deep
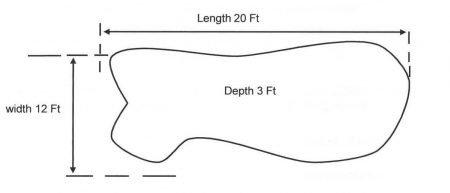
Liner Length (Pond Length) = 20ft (6.09m) + (2 x 3ft (0.91m)) + 2ft (0.61m) = 28ft (8.53m)
Liner Width (Pond Width) = 12ft (3.66m) + (2 x 3ft (0.91m)) + 2ft (0.61m) = 20ft (6.09m)
So the flat sheet size required to line the pond in this example would be 28ft x 20ft or 8.53m x 6.09m
Ready to order? Click right HERE for our best prices on rubber pond linings with FREE UK delivery !
Formal Geometric Ponds with vertical sides can make a fantastic feature in any garden. They are popular with Koi keepers and can easily be built above ground as well as below. Straightforward rectangular or square shaped liners made to exactly fit your formal pond can easily be ordered on our site. If you’d like to edge your pond with sleepers, slabs or coping stones, you’ll need a lip around the topmost edge of your liner. We call this a flange. A flange would typically measure between 4 and 6″. This will help keep the sides of the pond secure by tucking neatly under your edging materials.
We can also supply Polypropylene battening by the metre to fix the sides of your pond if required.
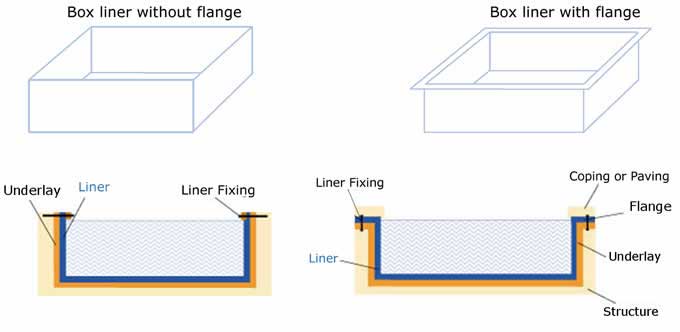
Our skilled factory technicians can custom make pre-formed 3 dimensional box welded liners to exactly fit stepped ponds with more than one depth as well as L shaped and circular ponds.
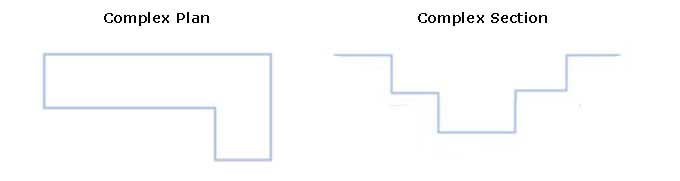 Simply Contact Us with your dimensional sketch or drawing and we will be pleased to provide pricing for a custom made liner to exactly fit your requirements.
The beauty of our liners is that we make each and every one to order so you’ll never pay for more material than you need and you’ll not have to deal with disposing of excess / wasted material.
Do I need Pipe Sleeves ? What are they?
If your pond has a filler or overflow pipe through the liner, then you’ll need a pipe sleeve. These are specially made rubber sleeves designed to fit over the pipe and seal to your liner, preventing leaks. We can supply a made to measure kit that you can easily install on site. Simply select the appropriate outside diameter from our pond liner store, set the quantity and pop into your shopping cart.
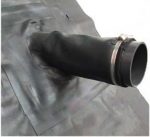 Rubber Pipe Sleeve
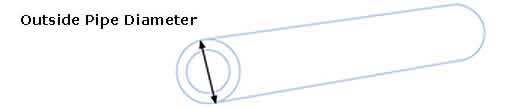
For a small additional fee we can weld your pipe sleeve into your liner in our factory before we despatch your order to you. All we need from you is a sketch or drawing showing us exactly where it needs to be positioned. You can attach this to an email using Contact Us.
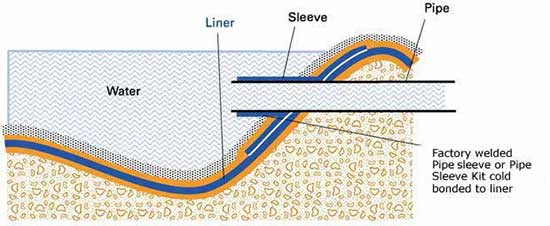
Pipe sleeves are available at both 90 and 45 degree angles.
Click HERE for our pipe sleeve fitting instructions.
OK.. You’ve designed and dug your pond, ordered your liner and now you’re ready to install it.
These few steps will have your liner installed simply and easily.
1. Clear the pond and surrounding area of any roots, stones or debris.

2. Lay the underlay to fit the contours of the pond and allow at least 50mm of overlap between strips.

3. Unroll the pond liner following the directions on the wrapping, and manoeuvre it across the pond using a flapping motion to ‘float’ it into place.
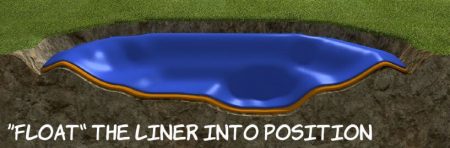
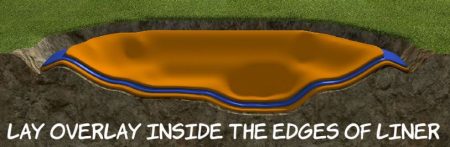
4. Avoid stretching the rubber as you position it, just let it wrinkle and pleat naturally to fit the contours of the pond. If you are not using overlay, you can skip step 5 and go straight to 6.
5. Now lay the overlay in the same way as the underlay – then cover it with soil, sand or stones, working from the centre out towards the anchor trench.
6. Fill the pond with water, letting the liner slip freely into the excavation, filling the contours. At this point you can smooth out any wrinkles or folds as the pond fills. If you need to be IN the pond to do this please remember that some footwear may damage your liner so great care must be taken, soft shoes or bare feet are always best.
Note: Children should be supervised around the area during the construction and filling of your pond.
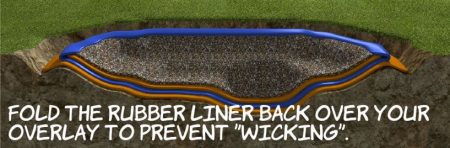
The permanent water level of your pond should be at least 0.15m below the top of your liner to prevent water loss due to capillary action into the surrounding soil. If you are using overlay, its outer edge should be below the edge of your rubber liner as this too may cause ‘wicking’ of water out of the pond and into the surrounding earth. To avoid this, allow an extra 0.6m on both the length and width of your liner and simply fold the edges of your rubber liner over the top of your overlay. This will prevent water from escaping from your pond through the geotextile protection material.
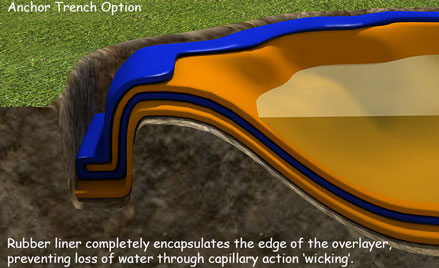
OR dig an anchor trench to ensure your liner & geotextile layer(s) are totally secure …
7. There may be a small amount of excess lining material, depending on the shape of your pond. This can be trimmed, but be sure to leave enough material for anchoring the liner under stones, railway sleepers, slabs or under the turf. Once your liner is trimmed and you’re happy – the trench can be backfilled with soil to secure the liner & underlay.
8. Finish off any edging detail you require.